2.3 Starting the Installation
Important: By default, the installation will not make any changes to your disk(s) until you see the following message:
Last Chance: Are you SURE you want continue the installation?

If you're running this on a disk with data you wish to save then WE
STRONGLY ENCOURAGE YOU TO MAKE PROPER BACKUPS before proceeding!

We can take no responsibility for lost disk contents!
The install can be exited at any time prior to the final warning without changing the contents of the hard drive. If you are concerned that you have configured something incorrectly you can just turn the computer off before this point, and no damage will be done.
2.3.1 Booting
2.3.1.1 Booting for the i386
-
Start with your computer turned off.
-
Turn on the computer. As it starts it should display an option to enter the system set up menu, or BIOS, commonly reached by keys like F2, F10, Del, or Alt+S. Use whichever keystroke is indicated on screen. In some cases your computer may display a graphic while it starts. Typically, pressing Esc will dismiss the graphic and allow you to see the necessary messages.
-
Find the setting that controls which devices the system boots from. This is commonly shown as a list of devices, such as Floppy, CDROM, First Hard Disk, and so on.
If you needed to prepare boot floppies, then make sure that the floppy disk is selected. If you are booting from the CDROM then make sure that that is selected instead. In case of doubt, you should consult the manual that came with your computer, and/or its motherboard.
Make the change, then save and exit. The computer should now restart.
-
If you needed to prepare boot floppies, as described in Section 2.2.7 then one of them will be the first boot disc, probably the one containing kern.flp. Put this disc in your floppy drive.
If you are booting from CDROM, then you will need to turn on the computer, and insert the CDROM at the first opportunity.
If your computer starts up as normal, and loads your existing operating system then either:
-
The disks were not inserted early enough in the boot process. Leave them in, and try restarting your computer.
-
The BIOS changes earlier did not work correctly. You should redo that step until you get the right option.
-
-
FreeBSD will start to boot. If you are booting from CDROM you will see a display similar to this (version information omitted):
    Verifying DMI Pool Data ........
    Boot from ATAPI CD-ROM :
     1. FD 2.88MB  System Type-(00)
    Uncompressing ... done

    BTX loader 1.00 BTX version is 1.01
    Console: internal video/keyboard
    BIOS drive A: is disk0
    BIOS drive B: is disk1
    BIOS drive C: is disk2
    BIOS drive C: is disk3
    BIOS 639kB/261120kB available memory

    FreeBSD/i386 bootstrap loader, Revision 0.8

    /kernel text=0x277391 data=0x3268c+0x332a8 |

    |
    Hit [Enter] to boot immediately, or any other key for command prompt.
    Booting [kernel] in 9 seconds... _
If you are booting from floppy disc, you will see a display similar to this (version information omitted):
    Verifying DMI Pool Data ........

    BTX loader 1.00  BTX version is 1.01
    Console: internal video/keyboard
    BIOS drive A: is disk0
    BIOS drive C: is disk1
    BIOS 639kB/261120kB available memory

    FreeBSD/i386 bootstrap loader, Revision 0.8

    /kernel text=0x277391 data=0x3268c+0x332a8 |

    Please insert MFS root floppy and press enter:
Follow these instructions by removing the kern.flp disc, insert the mfsroot.flp disc, and press Enter.
-
Irrespective of whether you booted from floppy or CDROM, the boot process will then get to this point:
    Hit [Enter] to boot immediately, or any other key for command prompt.
    Booting [kernel] in 9 seconds... _
Either wait ten seconds, or press Enter. This will then launch the kernel configuration menu.
2.3.1.2 Booting for the Alpha
-
Start with your computer turned off.
-
Turn on the computer and wait for a boot monitor prompt.
-
If you needed to prepare boot floppies, as described in Section 2.2.7 then one of them will be the first boot disc, probably the one containing kern.flp. Put this disc in your floppy drive and type the following command to boot the disk (substituting the name of your floppy drive if necessary):
>>>BOOT DVA0 -FLAGS '' -FILE ''If you are booting from CDROM, insert the CDROM into the drive and type the following command to start the installation (substituting the name of the appropriate CDROM drive if necessary):
>>>BOOT DKA0 -FLAGS '' -FILE '' -
FreeBSD will start to boot. If you are booting from a floppy disc, at some point you will see the message:
Please insert MFS root floppy and press enter:Follow these instructions by removing the kern.flp disc, insert the mfsroot.flp disc, and press Enter.
-
Irrespective of whether you booted from floppy or CDROM, the boot process will then get to this point:
    Hit [Enter] to boot immediately, or any other key for command prompt.
    Booting [kernel] in 9 seconds... _
Either wait ten seconds, or press Enter. This will then launch the kernel configuration menu.
2.3.2 Kernel Configuration
Note: From FreeBSD versions 5.0 and later, userconfig has been depreciated in favor of the new device.hints(5) method. For more information on device.hints(5) please visit Section 7.5
The kernel is the core of the operating system. It is responsible for many things, including access to all the devices you may have on your system, such as hard disks, network cards, sound cards, and so on. Each piece of hardware supported by the FreeBSD kernel has a driver associated with it. Each driver has a two or three letter name, such as sa for the SCSI sequential access driver, or sio for the Serial I/O driver (which manages COM ports).
When the kernel starts, each driver checks the system to see whether or not the hardware it supports exists on your system. If it does, then the driver configures the hardware and makes it available to the rest of the kernel.
This checking is commonly referred to as device probing. Unfortunately, it is not always possible to do this in a safe way. Some hardware drivers do not co-exist well, and probing for one piece of hardware can sometimes leave another in an inconsistent state. This is a basic limitation of the PC design.
Many older devices are called ISA devices--as opposed to PCI devices. The ISA specification requires each device to have some information hard coded into it, typically the Interrupt Request Line number (IRQ) and IO port address that the driver uses. This information is commonly set by using physical jumpers on the card, or by using a DOS based utility.
This was often a source of problems, because it was not possible to have two devices that shared the same IRQ or port address.
Newer devices follow the PCI specification, which does not require this, as the devices are supposed to cooperate with the BIOS, and be told which IRQ and IO port addresses to use.
If you have any ISA devices in your computer then FreeBSD's driver for that device will need to be configured with the IRQ and port address that you have set the card to. This is why carrying out an inventory of your hardware (see Section 2.2.1) can be useful.
Unfortunately, the default IRQs and memory ports used by some drivers clash. This is because some ISA devices are shipped with IRQs or memory ports that clash. The defaults in FreeBSD's drivers are deliberately set to mirror the manufacturer's defaults, so that, out of the box, as many devices as possible will work.
This is almost never an issue when running FreeBSD day-to-day. Your computer will not normally contain two pieces of hardware that clash, because one of them would not work (irrespective of the operating system you are using).
It becomes an issue when you are installing FreeBSD for the first time because the kernel used to carry out the install has to contain as many drivers as possible, so that many different hardware configurations can be supported. This means that some of those drivers will have conflicting configurations. The devices are probed in a strict order, and if you own a device that is probed late in the process, but conflicted with an earlier probe, then your hardware might not function or be probed correctly when you install FreeBSD.
Because of this, the first thing you have the opportunity to do when installing FreeBSD is look at the list of drivers that are configured into the kernel, and either disable some of them, if you do not own that device, or confirm (and alter) the driver's configuration if you do own the device but the defaults are wrong.
This probably sounds much more complicated than it actually is.
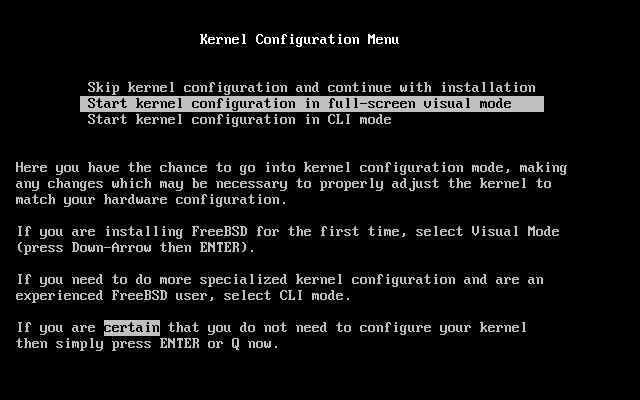
Figure 2-1 shows the first kernel configuration menu. We recommend that you choose the Start kernel configuration in full-screen visual mode option, as it presents the easiest interface for the new user.
The kernel configuration screen (Figure 2-2) is then divided into four sections.
-
A collapsible list of all the drivers that are currently marked as ``active'', subdivided into groups such as Storage, and Network. Each driver is shown as a description, its two or three letter driver name, and the IRQ and memory port used by that driver. In addition, if an active driver conflicts with another active driver then CONF is shown next to the driver name. This section also shows the total number of conflicting drivers that are currently active.
-
Drivers that have been marked inactive. They remain in the kernel, but they will not probe for their device when the kernel starts. These are subdivided into groups in the same way as the active driver list.
-
More detail about the currently selected driver, including its IRQ and memory port address.
-
Information about the keystrokes that are valid at this point in time.
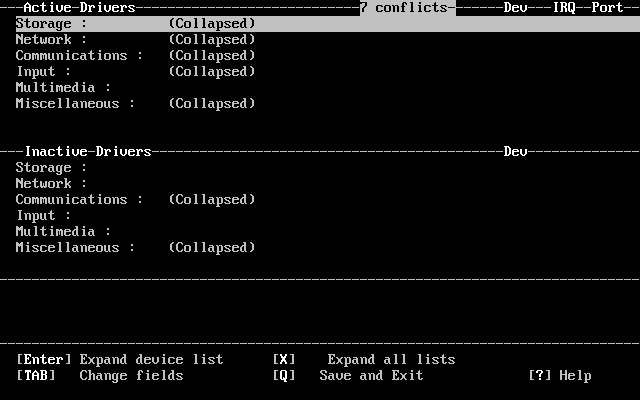
At this point there will always be conflicts listed. Do not worry about this, it is to be expected; all the drivers are enabled, and as has already been explained, some of them will conflict with one another.
You now have to work through the list of drivers, resolving the conflicts.
Resolving Driver Conflicts
-
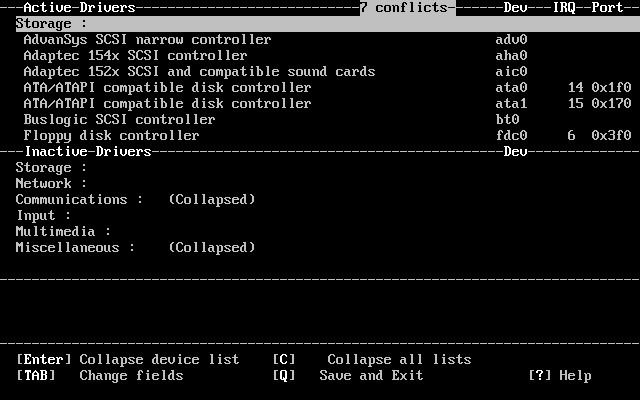
Press X. This will completely expand the list of drivers, so you can see all of them. You will need to use the arrow keys to scroll back and forth through the active driver list.
Figure 2-3 shows the result of pressing X.
-
Disable all the drivers for devices that you do not have. To disable a driver, highlight it with the arrow keys and press Del. The driver will be moved to the Inactive Drivers list.
If you inadvertently disable a device that you need then press Tab to switch to the Inactive Drivers list, select the driver that you disabled, and press Enter to move it back to the active list.
Important: Do not disable sc0. This controls the screen, and you will need this unless you are installing over a serial cable.
Important: Only disable atkbd0 if you are using a USB keyboard. If you have a normal keyboard then you must keep atkbd0.
-
If there are no conflicts listed then you can skip this step. Otherwise, the remaining conflicts need to be examined. If they do not have the indication of an ``allowed conflict'' in the message area, then either the IRQ/address for device probe will need to be changed, or the IRQ/address on the hardware will need to be changed.
To change the driver's configuration for IRQ and IO port address, select the device and press Enter. The cursor will move to the third section of the screen, and you can change the values. You should enter the values for IRQ and port address that you discovered when you made your hardware inventory. Press Q to finish editing the device's configuration and return to the active driver list.
If you are not sure what these figures should be then you can try using -1. Some FreeBSD drivers can safely probe the hardware to discover what the correct value should be, and a value of -1 configures them to do this.
The procedure for changing the address on the hardware varies from device to device. For some devices you may need to physically remove the card from your computer and adjust jumper settings or DIP switches. Other cards may have come with a DOS floppy that contains the programs used to reconfigure the card. In any case, you should refer to the documentation that came with the device. This will obviously entail restarting your computer, so you will need to boot back into the FreeBSD installation routine when you have reconfigured the card.
-
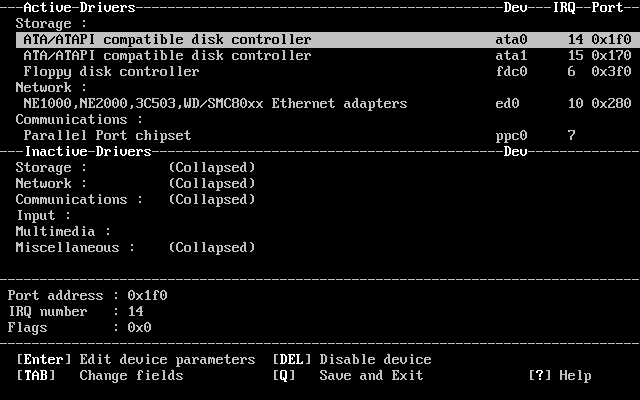
When all the conflicts have been resolved the screen will look similar to Figure 2-4.
As you can see, the active driver list is now much smaller, with only drivers for the hardware that actually exists being listed.
You can now save these changes, and move on to the next step of the install. Press Q to quit the device configuration interface. This message will appear:
Save these parameters before exiting? ([Y]es/[N]o/[C]ancel)Answer Y to save the parameters and the probing will start. After displaying the probe results in white on black text sysinstall will start and display its main menu (Figure 2-5).
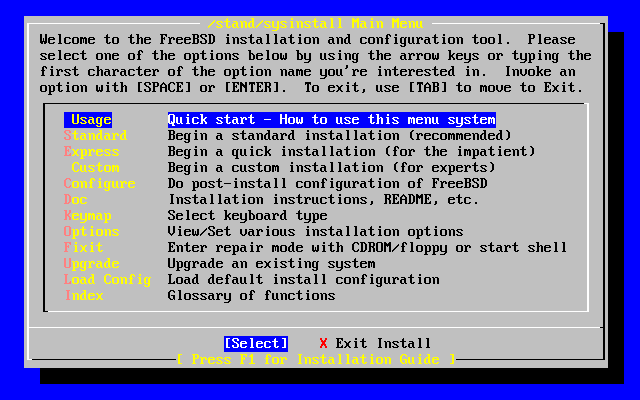
2.3.3 Reviewing the Device Probe Results
The last few hundred lines that have been displayed on screen are stored and can be reviewed.
To review the buffer, press Scroll Lock. This turns on scrolling in the display. You can then use the arrow keys, or PageUp and PageDown to view the results. Press Scroll Lock again to stop scrolling.
Do this now, to review the text that scrolled off the screen when the kernel was carrying out the device probes. You will see text similar to Figure 2-6, although the precise text will differ depending on the devices that you have in your computer.
Figure 2-6. Typical Device Probe Results
    avail memory = 253050880 (247120K bytes)
    Preloaded elf kernel "kernel" at 0xc0817000.
    Preloaded mfs_root "/mfsroot" at 0xc0817084.
    md0: Preloaded image </mfsroot> 4423680 bytes at 0xc03ddcd4

    md1: Malloc disk
    Using $PIR table, 4 entries at 0xc00fde60
    npx0: <math processor> on motherboard
    npx0: INT 16 interface
    pcib0: <Host to PCI bridge> on motherboard
    pci0: <PCI bus> on pcib0
    pcib1:<VIA 82C598MVP (Apollo MVP3) PCI-PCI (AGP) bridge> at device 1.0 on pci0
    pci1: <PCI bus> on pcib1
    pci1: <Matrox MGA G200 AGP graphics accelereator> at 0.0 irq 11
    isab0: <VIA 82C586 PCI-ISA bridge> at device 7.0 on pci0
    isa0: <iSA bus> on isab0
    atapci0: <VIA 82C586 ATA33 controller> port 0xe000-0xe00f at device 7.1 on pci0
    ata0: at 0x1f0 irq 14 on atapci0
    ata1: at 0x170 irq 15 on atapci0
    uhci0 <VIA 83C572 USB controller> port 0xe400-0xe41f irq 10 at device 7.2 on pci
    0
    usb0: <VIA 83572 USB controller> on uhci0
    usb0: USB revision 1.0
    uhub0: VIA UHCI root hub, class 9/0, rev 1.00/1.00, addr1
    uhub0: 2 ports with 2 removable, self powered
    pci0: <unknown card> (vendor=0x1106, dev=0x3040) at 7.3
    dc0: <ADMtek AN985 10/100BaseTX> port 0xe800-0xe8ff mem 0xdb000000-0xeb0003ff ir
    q 11 at device 8.0 on pci0
    dc0: Ethernet address: 00:04:5a:74:6b:b5
    miibus0: <MII bus> on dc0
    ukphy0: <Generic IEEE 802.3u media interface> on miibus0
    ukphy0: 10baseT, 10baseT-FDX, 100baseTX, 100baseTX-FDX, auto
    ed0: <NE2000 PCI Ethernet (RealTek 8029)> port 0xec00-0xec1f irq 9 at device 10.
    0 on pci0
    ed0 address 52:54:05:de:73:1b, type NE2000 (16 bit)
    isa0: too many dependant configs (8)
    isa0: unexpected small tag 14
    orm0: <Option ROM> at iomem 0xc0000-0xc7fff on isa0
    fdc0: <NEC 72065B or clone> at port 0x3f0-0x3f5,0x3f7 irq 6 drq2 on isa0
    fdc0: FIFO enabled, 8 bytes threshold
    fd0: <1440-KB 3.5" drive> on fdc0 drive 0
    atkbdc0: <Keyboard controller (i8042)> at port 0x60,0x64 on isa0
    atkbd0: <AT Keyboard> flags 0x1 irq1 on atkbdc0
    kbd0 at atkbd0
    psm0: <PS/2 Mouse> irq 12 on atkbdc0
    psm0: model Generic PS/@ mouse, device ID 0
    vga0: <Generic ISA VGA> at port 0x3c0-0x3df iomem 0xa0000-0xbffff on isa0
    sc0: <System console> at flags 0x100 on isa0
    sc0: VGA <16 virtual consoles, flags=0x300>
    sio0 at port 0x3f8-0x3ff irq 4 flags 0x10 on isa0
    sio0: type 16550A
    sio1 at port 0x2f8-0x2ff irq 3 on isa0
    sio1: type 16550A
    ppc0: <Parallel port> at port 0x378-0x37f irq 7 on isa0
    pppc0: SMC-like chipset (ECP/EPP/PS2/NIBBLE) in COMPATIBLE mode
    ppc0: FIFO with 16/16/15 bytes threshold
    plip0: <PLIP network interfce> on ppbus0
    ad0: 8063MB <IBM-DHEA-38451> [16383/16/63] at ata0-master UDMA33
    acd0: CD-RW <LITE-ON LTR-1210B> at ata1-slave PIO4
    Mounting root from ufs:/dev/md0c
    /stand/sysinstall running as init on vty0
Check the probe results carefully to make sure that FreeBSD found all the devices you expected. If a device was not found, then it will not be listed. If the device's driver required configuring with the IRQ and port address then you should check that you entered them correctly.
If you need to make changes to the UserConfig device probing, its easy to exit the sysinstall program and start over again. Its also a good way to become more familiar with the process.
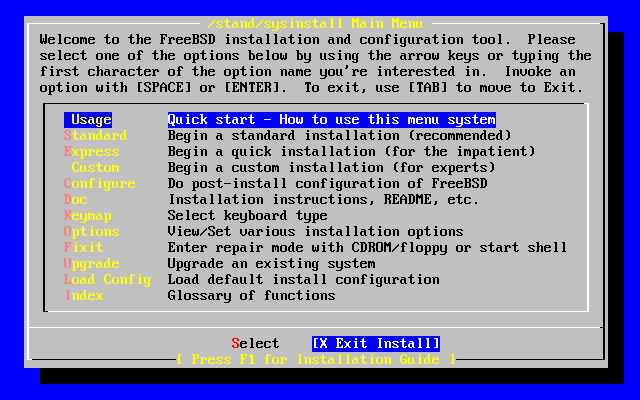
Use the arrow keys to select Exit Install from the Main Install Screen menu. The following message will display:
                          User Confirmation Requested
             Are you sure you wish to exit? The system will reboot
               (be sure to remove any floppies from the drives).

                                [ Yes ]    No
The install program will start again if the CDROM is left in the drive and [Yes] is selected.
If you are booting from floppies it will be necessary to remove the mfsroot.flp floppy and replace it with kern.flp before rebooting.